
Handheld Bidet Skirted Toilet Installation Guide
If you are looking for a guide on how to install a handheld bidet on your Skirted Toilet, this guide will walk you through the installation process step-by-step. We will show you everything you need to know about installing a handheld bidet on a skirted toilet, from the necessary hardware to the proper steps for preparing the bathroom.
Installing a bidet on a skirted toilet is an easy and cost-effective way to improve your bathroom experience. The handheld bidet will help improve your hygiene and give you more comfortable experience for your home and your business. You will need some basic tools and a few minutes to complete the installation. Be sure to read the entire guide before beginning so that you are fully prepared for the installation.
Bidets are a great way to improve your hygiene and relieve yourself in the most comfortable way possible. If you don’t have a bidet already, now is the time to install one on your skirted toilet.
What are skirted toilets?
Most people are familiar with the standard toilet-shaped fixture with a rounded front and a cylindrical back. But what about the skirted toilet? This type of toilet is characterized by a long, narrow skirt that extends from the floor to waist height or higher. It is a new style of toilet that was popularized in the United States in the early 2000s. They are often referred to as “wonder toilets”. Because they have many features that make them more comfortable and efficient than traditional toilets. They are typically more attractive, easier to clean and quieter. Additionally, they can help to conserve water as the waste is flushed through the skirt trapway rather than bends and curves you have through the toilet bowl.
These toilets have a skirt that hangs down below the level of the toilet seat. This skirt holds up a trapdoor that sits below the level of the toilet water. The skirt helps to keep your feet and legs clean while you use the toilet. Creating more private area for those who need to use the restroom, and making safer for people with disabilities. They also require less space than traditional toilets, and can be installed in tight spaces. It’s a popular choice for disabled people or people who want to conserve space in their bathroom.
There are a lot of different skirted toilets on the market, so it is important to find one that is comfortable for you.
Can I install a handheld bidet on the skittered toilet?
Handheld bidets are a great option for those who need to take care of their hygiene needs while using the toilet. In some cases, they can even be installed on skirted toilets. The installation of handheld bidets on skirted toilets is generally safe and can be done by yourself or a qualified plumber. There are a few handheld bidet models that include a skirt extension that allows them to be used on skirted toilets. However, there are a few considerations that should be taken into account. Before installing a handheld bidet, it is important to make sure that the water supply and drainage are adequate. The handheld bidet needs to be mounted high enough on the toilet, so that it is accessible from the seated position.
If you are considering installing a handheld bidet on your skittered toilet, be sure to understand the installation guidelines or speak with a professional before doing so.
Installation guide handheld bidet to skirted toilet
Step 1: Close the Toilet Water Supply Valve
When you’re installing a handheld bidet on a skirted toilet, be sure to close the water supply valve that controls water flow to the toilet. This will prevent any water from accidentally spraying out or leaking out of the tank and onto the floor which could create a slip and fall hazard and could cause any damage.
The first step is to locate the valve. It is usually located behind the toilet, near the floor. Once you have found the valve, turn off the water supply to the toilet by turning the valve counterclockwise so that it’s in a locked position. You may need to use some force, but don’t overdo it – just turn it until it stops moving. Once the valve is closed, you can then proceed further with installation. It’s important to remember that even if your toilet has a skirt, there’s still a chance that water could escape if the water supply valve isn’t closed properly. So be sure to take this extra step to avoid any mishaps.
Step 2: Install the Angle Valve Adapter
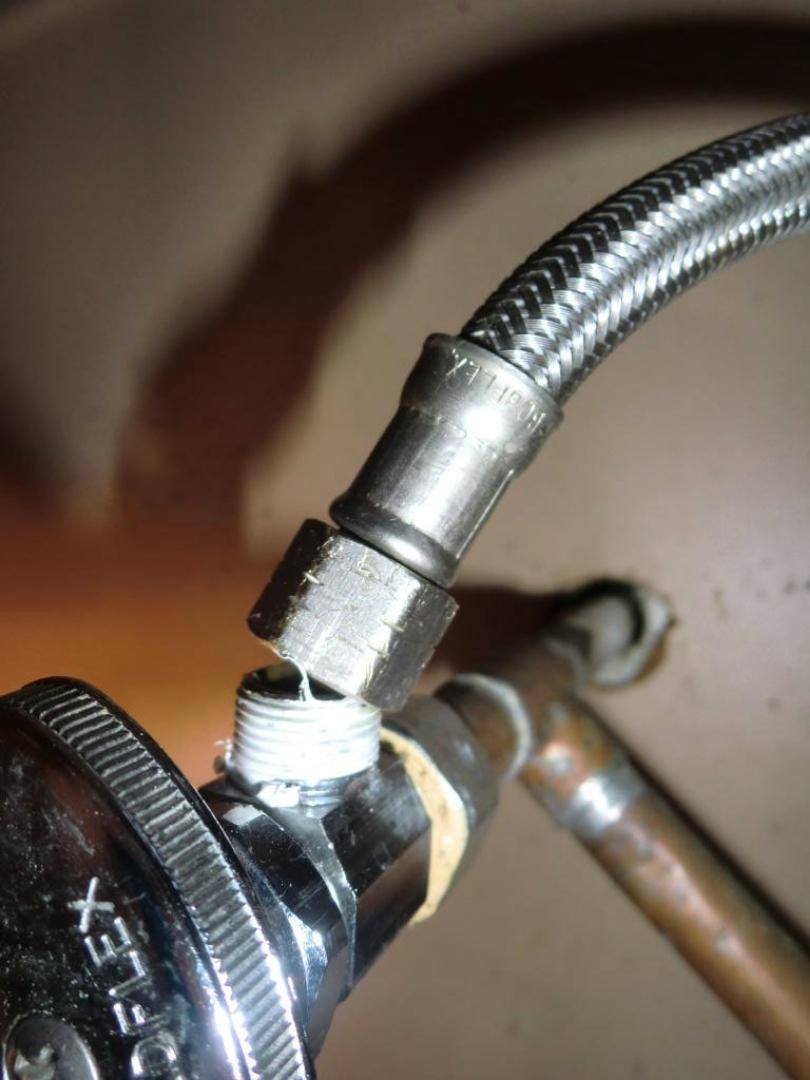
The first thing you need to do is turn off the water supply valve. Turn the handle counter clockwise until it stops. Once there is no water coming out on the water supply valve, then detach the flexible hose from the water supply valve.
Use a wrench or pliers to loosen the coupling nut that secures the hose to the water supply valve. Once the coupling nut is loosened, you should be able to pull the hose away from the valve. Once you’ve detached the flexible hose from the water supply valve, you can now proceed with attaching the angle valve adapter to the water supply valve.
Wrap Teflon tape around the threads of the water supply valve. This will help create a tight seal when you attach the angle valve. Screw the angle valve adapter to the water supply valve. Be sure not to over tighten, as this could damage the valves. Once the adapter is tight, attach the flexible hose to the angle valve adapter. You may need to use a wrench to tighten this connection.
-
Attach the flexible hose to angle valve adapter
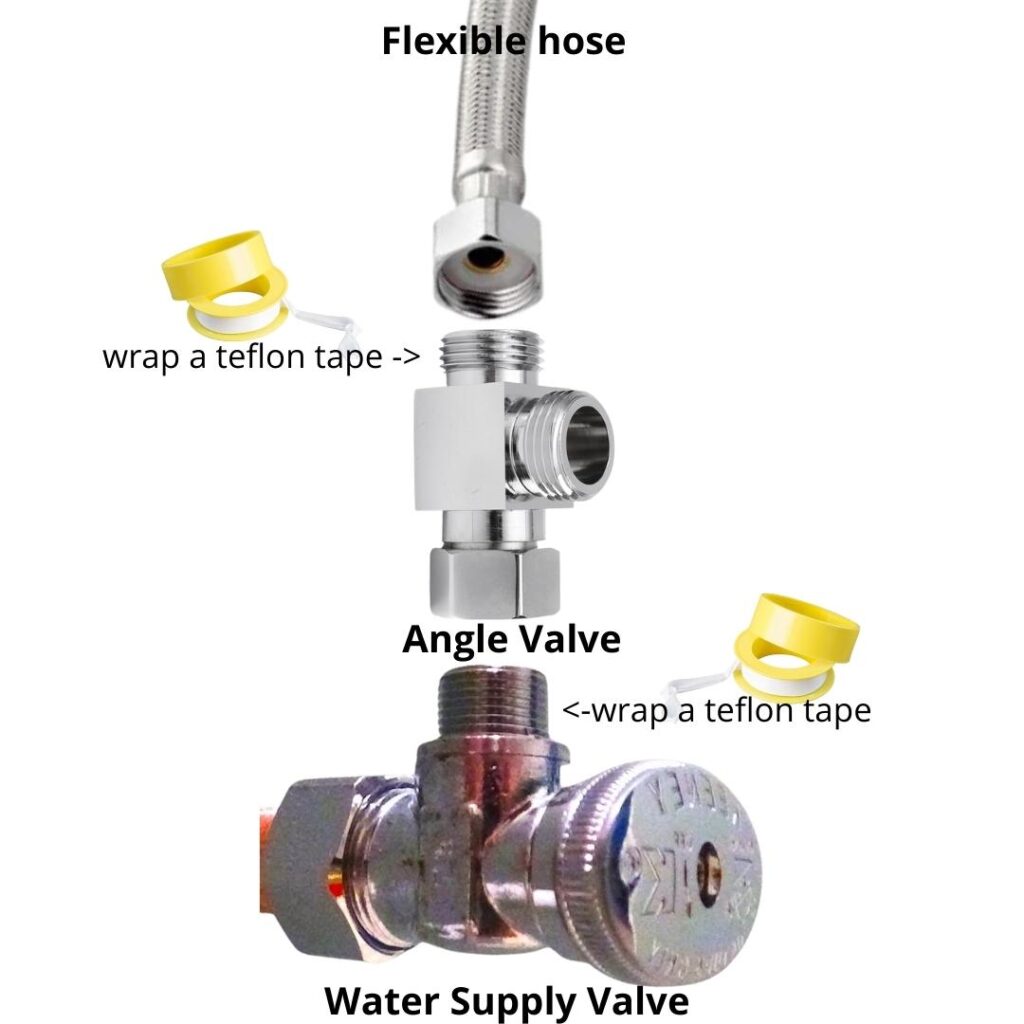
To attach the flexible hose to the angle valve adapter, wrap some teflon tape around the threads of the angle valve adapter. This will help create a tight seal when you attach the hose. Next, place the end of the hose over the adapter, making sure that the hose is inserted all the way. Use a pair of pliers to twist on the flexible hose until it’s snug against the adapter.
Step 3: Install the water shut off valve

A water shut off valve is important part of any plumbing system that used to regulate the flow of water. The valve is used to shut off the water supply in order to prevent system failure caused because of high water pressure.
It helps to ensure that the plumbing system will not be damaged by too much pressure.
To continue on the guide, find a water shut-off valve that is compatible with your angle valve adapter. Most adapters will have information about what size and type of shut-off valves they can accommodate. Once you have found a compatible valve, proceed to the next step. Properly connect the two pieces using Teflon tape or sealant. Put the washer to the angle valve, and screw the shut off valve until they’re tight. If everything is done correctly, you should now have a water shut off valve attached to your angle valve adapter.
Step 4: Attach Hose with Sprayer
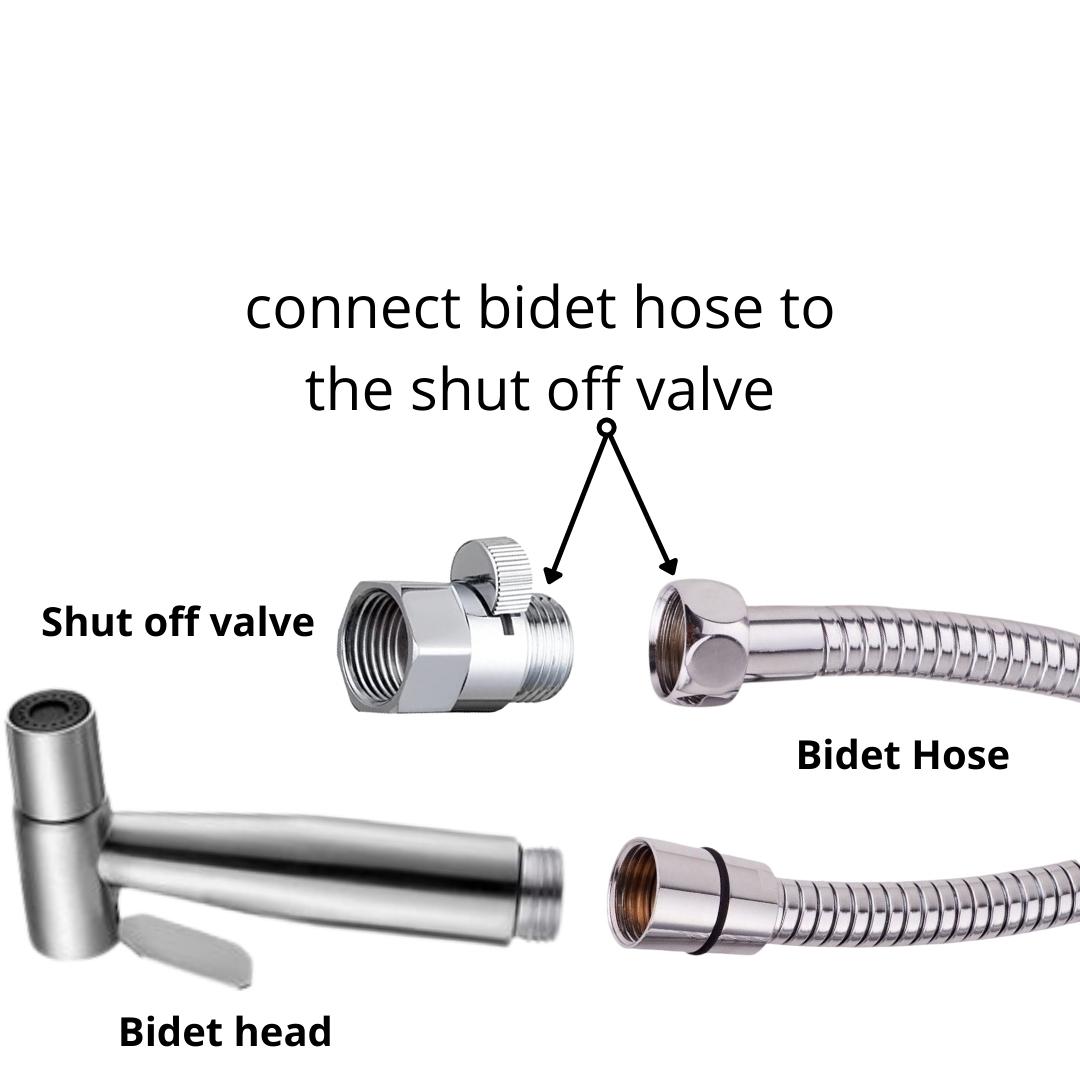
When it comes to using a handheld bidet, one of the most important elements is the hose. This is what delivers the water to wash your posterior, and as such, its design is crucial.
Connect the water hose to the shut off valve. The shut off valve should already be attached to the angle valve adapter. Once the hose is in place, tighten the screws to secure it. Make sure you are not overtightening it as it may damage the washer sealing Again, make sure that the connection is tight and there are no leaks.
The next step is to connect the other end of the water hose to the handheld bidet sprayer. Tighten the screws to secure it. Finally, turn on the water and test the handheld bidet sprayer to make sure it is working properly.
Make sure everything is connected in the right order and tightly fastened. To avoid making a mess, you don’t want to turn the water on or run the handheld bidet until you know everything is good to go.
Step 5: Turn the Water and Check for Leaks
To keep your bathroom in tip-top shape, It’s a good idea to know where your shutoff valve is located in case of a plumbing emergency. It’s important to occasionally check for leaks – especially around your toilet. If you have a major leak, you’ll need to be able to quickly turn off the water to prevent extensive damage.